Thursday, July 9, 2009

What's Your Color???

Colors have always been linked to emotion. Phrases like green with envy or red hot anger show the close connection that color has in our lives. So what does your favorite color reveal about your personality? Here’s what we found out …

• Red is the color of love, energy, passion, anger, excitement and courage.
• Orange is the color of energy, structure and social awareness.
• Yellow is the color of communication, expression and happiness.
• Green is the color of healing, balance, security and sometimes jealousy.
• Blue is the color of tranquility, harmony and creativity.
• Purple is the color of luxury and sensuality.
• White is the color of purity and cleanliness.
• Black, although void of color, is the color of detail and statistical personalities.

So next time you hear expressions like tickled pink or feeling blue, you’ll have a better idea of how color found its way into it all.

Monday, July 6, 2009

Win $100 to Spend

Click link to enter to WIN $100 to spend at Hobby Lobby.
Good Luck Gang!!

Wednesday, July 1, 2009

Whuddle World


I do love pixels & other graphics.
This is a place where they all meet
If you would like to join me in Whuddle World
please click link tag below
My screen name is MoonDogStar
When asked who referred you please copy &
paste my screen name in.

This site is completely kid friendly!!!
Thanks a million!!!


Thursday, June 25, 2009

July Dreams Week Offer


If you wish to request this FREE July tag click link below
It can be requested just with your name
& not Dream Tags Artist included


Photo: USA Ltc LAHIA DREAM TAG ARTIST | July Dreams Week album | Lahia/The Cajun Moon Dogs | Fotki.com

Shared via AddThis

Sunday, May 31, 2009

Potato Pancakes


Potato Pancakes

Prep Time:20 min
Start to Finish:25 min
Makes:18 pancakes

2eggs
1/4cup milk
2cups finely shredded uncooked potatoes, well drained
1/4cup Original Bisquick® mix
2tablespoons thinly sliced green onions
1teaspoon salt
1tablespoon butter or margarine


1.Beat eggs in medium bowl with hand beater until fluffy.
Stir in milk, potatoes, Bisquick mix, onions and salt. Melt butter in 10-inch skillet.

2.Drop dough by tablespoonfuls into skillet.

3.Cook about 3 minutes on each side or until golden brown.
(Total time will vary; cook or bake time is per batch.)

4. Place one to two on plate with a pouched egg & orange slices.

Recipe Tips
Did You Know...
Traditionally, potato pancakes are served with applesauce.
Success
Peeling and shredding your own potatoes?
Keep peeled potatoes soaking in cool water to prevent them from discoloring.

Wednesday, May 20, 2009

OMG What a Cutie.........

Here is Juicy's BIG Moment.
I have heard since he is about
4 months old "OMG What A Cutie!!"

"That is the happiest Baby I have ever seen..."
"You have to enter that baby in a contest"-
"He is Such A Cutie!!
"

So, I have...here is the links
Give My cutie a vote please
Thanks Y'all

Mott's Apple of My Eye Contest

Parents.com Cover Contest

Thursday, May 7, 2009

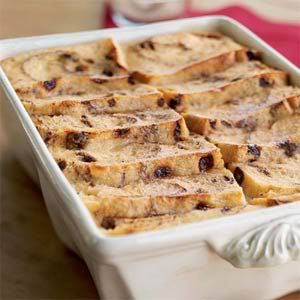
Stuffed French Toast

Stuffed French Toast


Yield

12 servings (serving size: 1 piece)

Ingredients

  • 24 (1-ounce) slices cinnamon-raisin bread
  • Cooking spray
  • 3 cups 1% low-fat milk
  • 2 cups egg substitute, divided
  • 1 cup half-and-half
  • 1 cup sugar, divided
  • 1 tablespoon vanilla extract
  • 1/8 teaspoon ground nutmeg
  • 1 (8-ounce) block fat-free cream cheese, softened
  • 1 (8-ounce) block 1/3-less-fat cream cheese, softened
  • Bottled cinnamon-sugar (optional)

Preparation

Trim crusts from bread. Arrange half of the bread in a 13 x 9-inch baking dish coated with cooking spray.

Combine milk, 1 1/2 cups egg substitute, half-and-half, and 1/2 cup sugar in a large bowl, stirring with a whisk. Pour half of milk mixture over bread in dish.

Combine 1/2 cup egg substitute, 1/2 cup sugar, vanilla, nutmeg, and cheeses in a food processor or blender; process until smooth. Pour cream cheese mixture over moist bread in dish. Top with remaining bread; pour remaining milk mixture over bread. Cover and refrigerate 8 hours or overnight.

Preheat oven to 350°.

Uncover and bake at 350° for 55 minutes. Let stand 10 minutes before serving. Sprinkle with cinnamon-sugar, if desired.


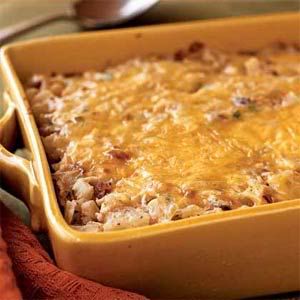
Hash Brown Casserole with Bacon, Onions, and Cheese

Hash Brown Casserole with Bacon, Onions, and Cheese

Though filling enough as a main dish, you can also serve smaller portions of this creamy, cheesy casserole as a tasty side to scrambled eggs. We enjoyed the way the Classic Melts cheese blend melted over the casserole; substitute cheddar cheese if you can't find this product.

Yield

6 servings (serving size: about 1 cup)

Ingredients

  • 6 bacon slices
  • 1 cup chopped onion
  • 2 garlic cloves, minced
  • 1 (32-ounce) package frozen Southern-style hash brown potatoes
  • 1 cup (4 ounces) preshredded Classic Melts Four Cheese blend, divided
  • 1/2 cup chopped green onions
  • 1/2 cup fat-free sour cream
  • 1/2 teaspoon salt
  • 1/4 teaspoon freshly ground black pepper
  • 1 (10.75-ounce) can condensed 30% reduced-sodium, 98% fat-free cream of mushroom soup, undiluted
  • Cooking spray

Preparation

Cook bacon in a large nonstick skillet over medium heat until crisp. Remove bacon from pan, and crumble. Discard drippings in pan. Add 1 cup onion and garlic to pan; cook for 5 minutes or until tender, stirring frequently. Stir in the potatoes; cover and cook for 15 minutes, stirring occasionally.

Combine crumbled bacon, 1/4 cup cheese, green onions, sour cream, salt, pepper, and soup in a large bowl. Add potato mixture; toss gently to combine. Spoon mixture into an 11 x 7-inch baking dish coated with cooking spray. Sprinkle with remaining 3/4 cup cheese. Cover with foil coated with cooking spray. Refrigerate 8 hours or overnight.

Preheat oven to 350°.

Remove casserole from refrigerator; let stand at room temperature 15 minutes. Bake casserole, covered, at 350ยบ for 30 minutes. Uncover and bake an additional 30 minutes or until bubbly around edges and cheese begins to brown.

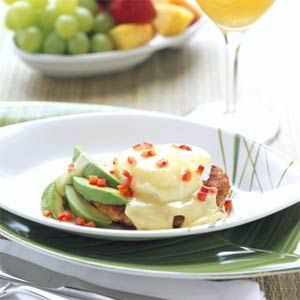
Caribbean Crab Cakes Benedict

Caribbean Crab Cakes Benedict


Yield

Makes 6 servings

Ingredients

  • 3 saltine crackers
  • 3 (1-ounce) slices French bread, torn
  • 1 pound fresh lump crabmeat, drained
  • 1 cup mayonnaise
  • 1 egg white
  • 2 tablespoons fresh lemon juice
  • 1/2 teaspoon ground ginger
  • 1/4 teaspoon ground red pepper
  • 1/4 teaspoon seafood seasoning
  • 1/4 cup peanut oil
  • 2 tablespoons unsalted butter
  • 2 avocados, peeled and sliced
  • 6 large eggs, poached
  • Caribbean Hollandaise Sauce
  • Cracked black pepper
  • Garnish: diced red bell pepper

Preparation

Place crackers in a blender or food processor; process until finely ground. Place bread in blender or food processor; process until finely ground.

Combine crabmeat, mayonnaise, cracker crumbs, breadcrumbs, egg white, and next 4 ingredients in a large bowl. Cover and chill 8 hours.

Shape crab mixture into 6 (4-inch) patties. Cook crab cakes, in batches, in hot oil and melted butter in a large skillet over medium-high heat 4 minutes on each side or until golden.

Place avocado slices and poached eggs on crab cakes, and top with Caribbean Hollandaise Sauce and pepper. Garnish, if desired.

Wednesday, March 18, 2009

Coffee Contest!!

Cafe Britt sweepstakes


Good Luck to all who enter!!!

PersonalizationMall Codes


PersonalizationMall.com

PersonalizationMall.com


Code

Description

Expires

PM8845

5% off any order

NA

PM6244

10% off any order

NA

PM3201

15% off any order

NA

PM6680

$5 off any order with minimum $15 purchase

NA

PM5514

$10 off any order with minimum $50 purchase

NA

PM9837

$15 off any order with minimum $75 purchase

NA

PM2088

$20 off any order with minimum $125 purchase

NA

PM0377

$25 off any order with minimum $250 purchase

NA

PM5551

Free shipping on any order with minimum $50 purchase

NA

Insects Anyone???

Rex had his birthday on March 7th-Perfect timing for a Sat adventure...
We never dare to do this alone-
so of course the G'Old Dogs
had to join in with us just to lend a hand in controlling the pack of 3.--
YES it does take 4 adults to hand 3 dogs...
I have my cousin who works at the
Insect aquarium In New Orleans-
So that was our 1st stop...


I'll be honest I really thought what could
they possibly do that would be impressive with BUGS...
I was impressed though-
very educational, colorful, & entertaining.

All the adults were AMAZED!!
It really is a beautiful way to show case BUGS!!!


Here is a few pictures surrounding our day there.


This is a "LOVE BUG" car-to cute on education
I must say The windshield was a big flat screen
talking all about the "Love Bugs" we have as insects in our area.


This is in the exhibit all about Beatles-
the armor was a example & model that the
kiddies, Spot just had to stick his face in it-


Here is the NEW bike-
G'Old Dogs bought Rex for his birthday
Rex has managed to hold on to a bike for over 4 years.
It was time for a new one...& He is proud to own it!!


Rex isn't to picky with his cakes...
OK OK he wants Chocolate on Chocolate
I wanted almond on almond...
LOL The blue one below is my almond creation.
Below that is the Chocolate on chocolate.
I may not be the fanciest when decorating but,
I thrive on the taste factor!!
Both were delicious!!!


We also took time to head on over to the
Audubon Zoo
Rex had been there for a class trip
but, Spot & Juicy hadn't
&7 it's been years since big dog &
G'old dogs had been there too.

(yes it is very hard to take pictures of my dogs...
esp when they are not together at the same time-
I make do as best as I can...LOL)


Camping Anyone??

Here in the south we have Mardi Gras vacation.
It takes a week up near Ask wenesday
the children have NO school...YEAHH

My dogs hit the roads & went camping with the G'Old dogs.
here is a few pictures of their adventures!!


Patient fisherman Rex-
The fish won't mind if he stops to pose for a few pictures!!


Spot thinking about where to cast his line


The lil dogs with G'old Dog Maw
They said it was COLD & WINDY coming off the lake!!


Nothing says camping like a fire-
the dogs with G'old dog Paw

Working or Worm Hunting??

Big Dog was busy one day extending out our draining system from the shed to the far end of the back yard-we had to move our washer & new dryer out there due to the over flowing pipe in our house....We wash to many batches of clothes in one day & the pipe was having no rest to drain properly...therefore it was over topping on to my dining/kitchen floors...flooding mess!!!!

Juicy was all to curious to what his daddy was doing out there. After watching for a hour he wanted to crawl in & see what was so cool about being in a 2 foot hole...LOL

And that is where the Worm Hunting came in.....


Humm I wonder what did Big Dog & Juicy find in that hole...??


"I don't know-but, it tastes kinda yummy, squishy, & it moves"


"Yep Mommy, It's a WORM"
Juicy managed to stick it in his mouth-didn't chew down
the worm managed to squirm free before it became a snack

St. Paddy Recipe

Beef Roast and Cabbage Dinner

Recipe called for Corned Beef but, here in Cajun Country that is a hard meet to find. I used a regular Beef Roast-Everyone was very happy with the results & enjoyed their meal very much!!!


Ingredients

  • 1 (4-pound) cured corned beef brisket, trimmed
  • 3 cups water
  • 1 cups chopped onion
  • 1 cup chopped celery
  • 3 garlic cloves, peeled
  • 2 tablespoons chopped parsley
  • Salt & Pepper rubbed on beef
  • 1 (2 1/2-pound) head green cabbage, cored and cut into 1-inch strips
  • 1 (14.9 fl oz) can Guinness Stout Beer
  • 4 pounds small red potatoes, quartered
  • 1 cup chopped carrot

Preparation

Season top of beef with salt, pepper, thyme, & oregano. Rub into meat throughly.

Place beef in a large Crock Pot set on high; add chopped onion, celery to sides of beef & cover whole pot with cabbage. Add in beer & water. Cover pot & allow food to cook for 4-6 hours.

Meat will be extra tender & juicy. After beef is tender & fully cooked remove from pot.

Leaving beef stock in pot add in chopped potatoes & carrots allowing to cook for 1 hour.

Once cooking in complete-drain out potatoes & carrots place them on a baking sheet for 20 mins in oven to give light crispy brown skin.

Place beef in center of large tray, adding cabbage to one side & potatoes & carrots to other side.


*I didn't use the celery except for cooking & flavoring the beef-The taste of them after wards was just plain yuck!! BUT, the celery did give the meat a great taste!!*

Who Are You???

Oh My My..Been gone way to long...
Time to get back in the swing of things.
I have so much to share with y'all-
The dogs have been very active getting into
all kinds of mischievous behavior.

I have the pass 2 weeks some sickly dogs that are all better now.
We had rearrange some rooms again making them into new spots.

Painting...I did a bit of that as well...

Rex had a birthday-March 7th Turned 9 years old
I have pictures to describe that event.

March 15th i had my Anniversary-Nothing special just another year passed to remind my husband he is still survived!!! (barely)

I have a new recipe to share with you all-I did a full blow St. Paddy recipe yesterday-It was also my Parents' Anniversary-to many years to count!!

Things will be averagely slow for the next few weeks-pending nothing weird happens...LOL...what am I saying...Hello ME..."The Dogs" Never average!!

Next few post I will reflect on the Happens of our latest crazy month.

Stay Tuned!!!


Thursday, February 12, 2009

Stuffed Sweet Potato

Stuffed Sweet Potato

Gather all ingredients before beginning recipe

Equipment: Oven safe pan, Oven, Knife, oven mits, measuring cups

Step 1
Sweet Potato 1 ea

Step 2
Marshmallows 1 Cup
Caramel Sauce 2 oz

Always wash your hands and sanitize work area and equipment before starting any recipe.

  • Once you cook your sweet potato make an cut in the top of the potato.
  • Using oven mitts open the potato by pushing the ends toward the center.
  • Place ½ the marshmallows into the sweet potato
  • Pour 2 oz of your favorite caramel sauce over the marshmallows.
  • Place the rest of the marshmallows over the caramel sauce.
  • Put potato bake on an oven safe pan and put back in the oven on Broil.
  • Remove from oven when marshmallows start to brown.
  • Serve as soon as possible.

Friday, February 6, 2009

Candy Sugar Hearts


These homemade conversation hearts make a wonderful Valentine’s Day gift. This recipe produces candy hearts that taste just like the ones you buy at the store, but your homemade hearts can be customized with whatever drawings or messages you choose. Be sure not to miss the photo tutorial with step-by-step illustrations showing how to make conversation hearts!

This recipe requires an extensive drying period, so be sure to start this process 24 hours before you need the hearts. Additionally, you will need special food-coloring markers for writing on the hearts, such as the "Gourmet Writer" markers from AmeriColor.

Ingredients:

  • 1 packet (1/4 oz, or 2 tsp) unflavored gelatin
  • 1/2 cup water
  • 2 tsp light corn syrup
  • 2 lbs powdered sugar, plus additional for dusting
  • Assorted flavoring extracts of your choice
  • Assorted food colors of your choice
  • Heart-shaped cutters
  • Food coloring markers

Preparation:

1. Place the corn syrup, gelatin, and water in a small microwave-safe bowl. Stir until the gelatin is well-distributed. Microwave the mixture for 30 seconds, so the gelatin dissolves, and stir well.

2. Pour the gelatin mixture into the bowl of a large stand mixer fitted with a paddle attachment. Alternately, if you are using a hand mixer, pour the gelatin mixture into a large bowl. Add 1 cup of powdered sugar and turn the mixer to low, mixing until the sugar is incorporated.

3. Once the sugar is mixed in, add another cup of sugar, again mixing on low until it liquefies. Continue to add the remaining powdered sugar, one cup at a time, pausing in between additions to allow the sugar to mix in, until the full two pounds of powdered sugar is added. Periodically, stop the mixer and scrape down the bottom and sides of the bowl. The candy will progress from a thin, watery liquid to a very stiff dough.

4. Once all of the sugar is incorporated, dust a work surface (counter or large cutting board) with powdered sugar and scrape the candy out onto the work surface. The candy will be very sticky and stiff. Generously dust the top of the ball of candy with powdered sugar, and begin to knead the candy like bread dough: fold the ball of dough over onto itself, then use the heel of your hand to push it down. Give the candy a quarter-turn, and repeat the process, dusting it with more powdered sugar as often as necessary to prevent it from sticking to the board or your hands. Knead until the candy is satiny and not sticky.

5.Decide how many colors/flavors of conversation hearts you want to make, and divide the candy dough into that many portions. To flavor and color the candy, take one of the balls and flatten it into a palm-sized disc. Add a few drops of food coloring and flavoring extract to the center of the disc, and fold it over on itself. (It is a good idea to wear disposable plastic gloves during this step to keep your hands free of colors and odors.) Knead the dough ball, just as you did before, until the color is evenly dispersed throughout the candy, and all streaks have disappeared. Repeat this process with remaining candy balls and colors/flavors, until all of your candy is colored and flavored.

6. Dust your work surface and a rolling pin with powdered sugar, and roll out one of the candy balls to your desired thickness. Small store-bought conversation hearts tend to be fairly thick, generally over 1/4” thick. I find that this thickness works well for small hearts (under 1”), but it makes larger heart sizes very substantial and a little overwhelming. However, the thickness is entirely a matter of personal preference and does not affect the taste of the final candy.

7. Use heart-shaped cutters to cut hearts out of the rolled candy, and transfer the hearts to a baking sheet lined with parchment paper. Smaller hearts are more realistic, but larger hearts are easier to write messages on. Once you have cut out your hearts, you can re-roll the scraps to get more shapes out of the candy. Repeat with remaining candy balls.

8. Allow your hearts to air-dry for at least 24 hours before you write on them. This step is VERY important, because the extra moisture in the hearts will cause the ink to run if you do not let them dry properly.

9. After the hearts have dried for a day, use the food writing markers to write messages or draw designs on the hearts. Store your conversation hearts in an airtight container at room temperature.

Rock Pop Candy Part 2


Allow the sugar syrup to cool for approximately 10 minutes off the heat. Place a large-mouthed funnel over the top of the jar.


Carefully pour the hot syrup into the jar through the funnel


Carefully lower the sugared skewer or string until it hangs about 1 inch from the bottom and fasten at the top with clothespins or balanced from a pencil. Do not let the end of the skewer or string come too close to the bottom or sides of the jar, or else the rock candy will grow into the sides of the jar. Carefully place your jar in a cool place, away from harsh lights, where it can sit undisturbed. Cover the top loosely with plastic wrap or paper towel. You should start to see sugar crystals forming within 4-6 hours. If you have seen no change to your skewer or thread after 24 hours, try boiling the sugar syrup again and dissolve another cup of sugar into it, then pour it back into the jar and insert the string or skewer again.


Allow the rock candy to grow until it is the size you want. This process will take up to a week, depending on how large you want your rock candy. Don’t let it grow too large, otherwise it might start growing into the sides of your jar! Once it has reached the size you want, remove it and allow it to dry for a few minutes, then enjoy or wrap in plastic wrap to save it for later.

**Dog Note-We wrapped ours in clear candy wrappers & used colored twist ties to hold wrapped secure on stick.**

Rock Pop Candy Part 1

We had done this one in the pass the dogs & I It did take a week & a few days to get the stick covered nicely but it was well worth it....Rex handed them out to his class- We used the others with our afternoon hot tea... We prepared 4 mason jars worth... In the lids I cut holes to hold the skewer stick in place This work better then the clothes pins for me. I hope we get around to it & do it again this week-end for Rex;s class this year & Valentine's day. I'll post back what ours turned out looking like next week!
Enjoy recipe below:


Rock candy is a simple sugar candy that can double as a science experiment. The process can take up to a week, but it’s fun to watch the sugar crystals growing over time. Note that the exact quantity of sugar syrup you will use depends on the size of the jar you have. If you want to make several pieces of rock candy, use multiple jars and skewers, and double or triple the sugar syrup solution as necessary. For easily printable instructions, please see the rock candy recipe. Begin by assembling your ingredients:
  • 2 cups water
  • 4 cups granulated sugar
  • 1/2-1 tsp flavoring extract or oil (optional)
  • food coloring (optional)
  • glass jar
  • skewer or thread (see below)
Prepare your materials: wash a glass jar thoroughly with hot water to clean it. To make rock candy on a wooden stick, cut a thin skewer until it is slightly taller than your jar. Use clothespins balanced across the top of the jar to clip it into place. This method is illustrated above. Alternately, you can make your rock candy on a string instead. Cut a length of thick cotton thread or kitchen twine a few inches longer than the height of the jar, and tape it to a pencil. Place the pencil across the lip of the jar, and wind it until the thread is hanging about 1 inch from the bottom of the jar. Attach a paper clip to the bottom of the thread to weigh it and ensure it hangs straight down.


Wet your thread or wooden skewer, and roll it in granulated sugar. This base layer will give the sugar crystals something to “grab” when they start forming. Set the thread or skewer aside to dry while you prepare your sugar syrup.


Place the water in a medium-sized saucepan over medium heat and bring it to a boil.


Begin adding the sugar, one cup at a time, stirring after each addition. You will notice that it takes longer for the sugar to dissolve after each addition.


Continue to stir and boil the syrup until all of the sugar has been added and it is all dissolved. Once the syrup is entirely liquid and smooth, remove the pan from the heat.


If you are using colors or flavorings, add them at this point. If you are using an extract, add 1 tsp of extract, but if you are using flavoring oils, only add ½ tsp, and make sure you don’t stand right in front of the pan—the scent can be very strong as it rises in the steam. Add 2-3 drops of food coloring and stir to ensure even, smooth color.